Як створити віртуальну машину за допомогою Hyper-V: покрокове керівництво
- Опубліковано: липень 30, 2022
- Оновлено: серпень 2, 2022
Hyper-V – це функція віртуальної машини, яка була розроблена компанією Microsoft, і вперше представлена у Windows Server 2008. Hyper-V дозволяє створювати декілька віртуальних машин та запускати їх на одному фізичному сервері.

За допомогою платформи Hyper-V ви можете керувати всіма віртуальними машинами, що працюють, з однієї панелі, а саме з Диспетчера Hyper-V.
Hyper-V поєднує віртуальні сервери на одному фізичному комп’ютері, що дозволяє значно скоротити пов’язані з цим витрати. Крім того, Hyper-V дозволяє краще використовувати обладнання, виділяючи обчислювальні ресурси тим віртуальним машинам, які найбільше їх потребують. Таким чином, ви можете побудувати легко реалізоване віртуальне середовище, яке повністю відповідатиме вашим потребам та завданням.
Мінімальні вимоги до системи для Hyper-V на сервері Windows
Перш ніж розпочати процес встановлення Hyper-V, переконайтеся, що ваша система відповідає наступним вимогам:
- 64-бітовий процесор з трансляцією адрес другого рівня (SLAT).
- Монітор віртуальної машини (це програма, яка контролює роботу кількох віртуальних машин у системі).
- Мінімум 4 ГБ оперативної пам’яті.
- Апаратна віртуалізація (Intel VT чи AMD-V).
- Апаратне запобігання виконанню даних з бітом NX для систем AMD або бітом XD для систем Intel.
Встановлення Hyper-V
Hyper-V є вбудованою опцією у Windows Server 2008 та пізніших версіях. Однак, за замовчуванням вона не активна, тому вам потрібно настроїти її самостійно. Існує три способи включення Hyper-V в Windows:
- системні налаштування Windows;
- інтерфейс командного рядку PowerShell (CLI);
- обслуговування образів розгортання та керування ними (DISM).
Процес встановлення Hyper-V за допомогою панелі керування Windows
Давайте розглянемо найпопулярніший спосіб і встановимо Hyper-V, скориставшись панеллю керування Windows:
1. У рядку пошуку на панелі завдань введіть «Налаштування» та натисніть «Enter».
2. Після того, як ви відкрили «Налаштування», виберіть «Програми». Далі у розділі «Пов’язані налаштування» праворуч клацніть на «Програми та компоненти».
3. Зліва виберіть «Увімкнути або вимкнути компоненти Windows».
4. У діалоговому вікні «Компоненти Windows» оберіть «Hyper-V» та натисніть «ОК».
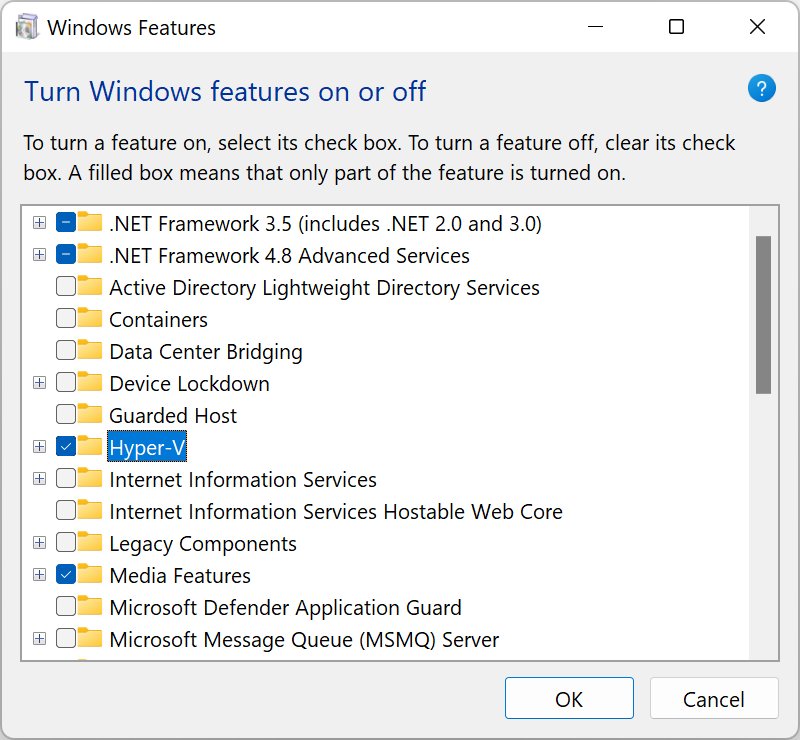
Після завершення процесу встановлення Hyper-V перезавантажте комп’ютер, щоб застосувати всі необхідні зміни.
Використання Hyper-V Manager
Для повноцінної роботи з Hyper-V, вам потрібно запустити програму «Диспетчер Hyper-V». Ви знайдете його у списку встановлених програм.
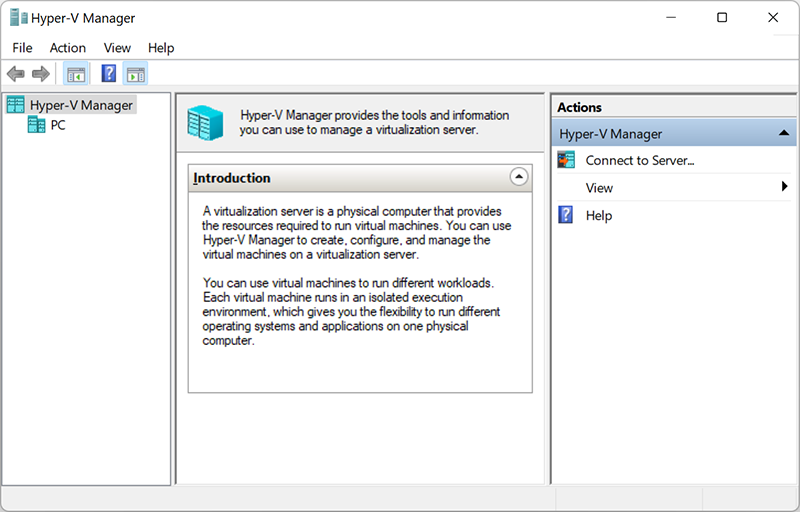
Диспетчер Hyper-V є таким собі інструментом для серверів. Його можна використовувати для запуску віртуальних машин на вашому ПК – у цьому випадку ваш локальний комп’ютер працює як локальний сервер віртуалізації.
Створення віртуального комутатора для віртуальних машин Hyper-V
Після встановлення Hyper-V на свій комп’ютер ви вже можете розпочати створення нових віртуальних машин. Але перед цим слід подумати про створення віртуального комутатора, який надалі буде використовуватися для забезпечення зв’язку між віртуальними машинами.
Крім того, це дозволить вам підключати віртуальні машини як до фізичних, так і до віртуальних мереж. Також, віртуальні комутатори дають можливість перенесення віртуальних машин із одного фізичного хоста на інший.
Ви можете легко створити віртуальний комутатор за допомогою диспетчера Hyper-V, дотримуючись цієї інструкції:
1. Відкрийте «Диспетчер Hyper-V» та виберіть ім’я хост-комп’ютера.
2. На панелі швидкого доступу диспетчера Hyper-V клацніть на «Дія» та у випадаючому меню виберіть «Віртуальний комутатор».
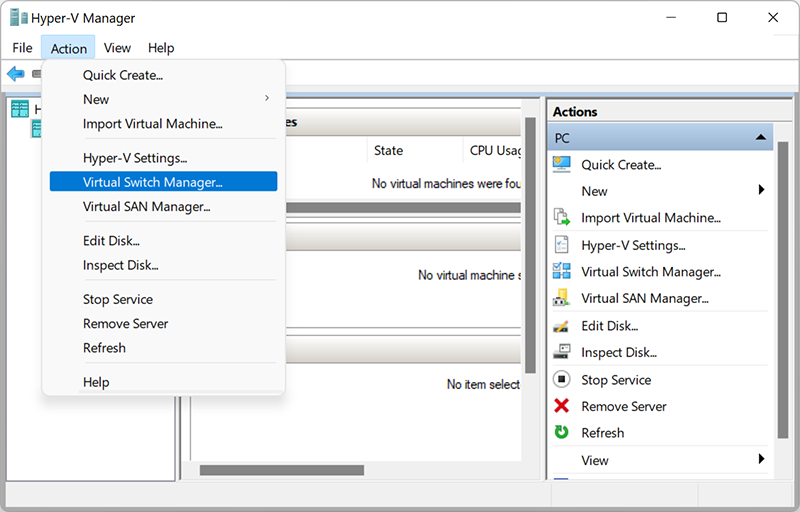
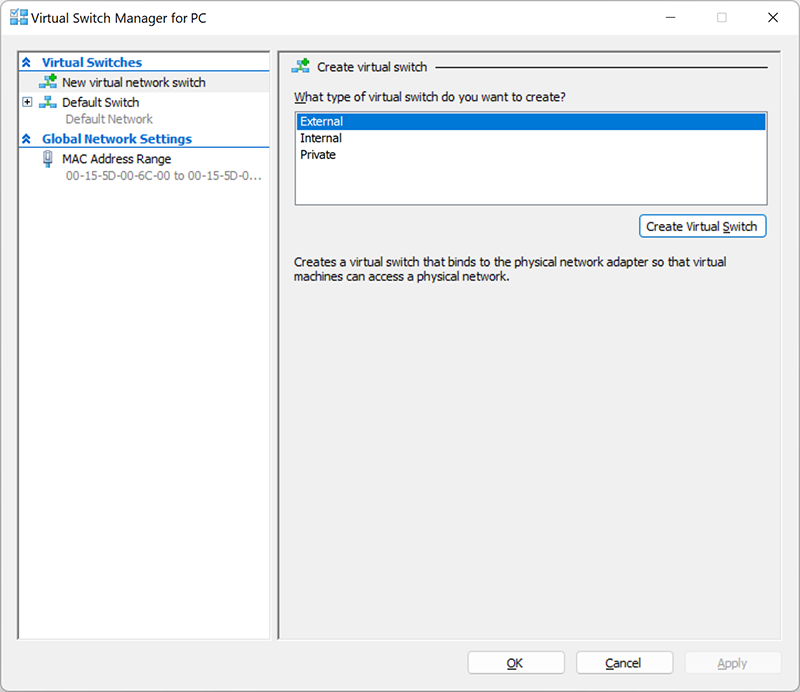
Після того, як відкриється «Віртуальний комутатор», вам слід вибрати тип віртуального комутатора з трьох можливих:
- Внутрішній (Internal): допомагає створити віртуальний комутатор, доступний лише для віртуальних машин, що працюють на цьому фізичному комп’ютері, але не забезпечує доступ до фізичного мережного підключення.
- Зовнішній (External): допомагає створити віртуальний комутатор, який надає доступ віртуальним машинам до фізичної мережі шляхом прив’язки до фізичного мережного адаптера.
- Приватний (Private): допомагає створити віртуальний комутатор, який може використовуватися віртуальними машинами, що працюють лише на одному фізичному комп’ютері. Приватна мережа дозволяє створити ізольоване мережеве середовище, доступ до якого ззовні неможливий.
3. Виберіть «Створити віртуальний комутатор».
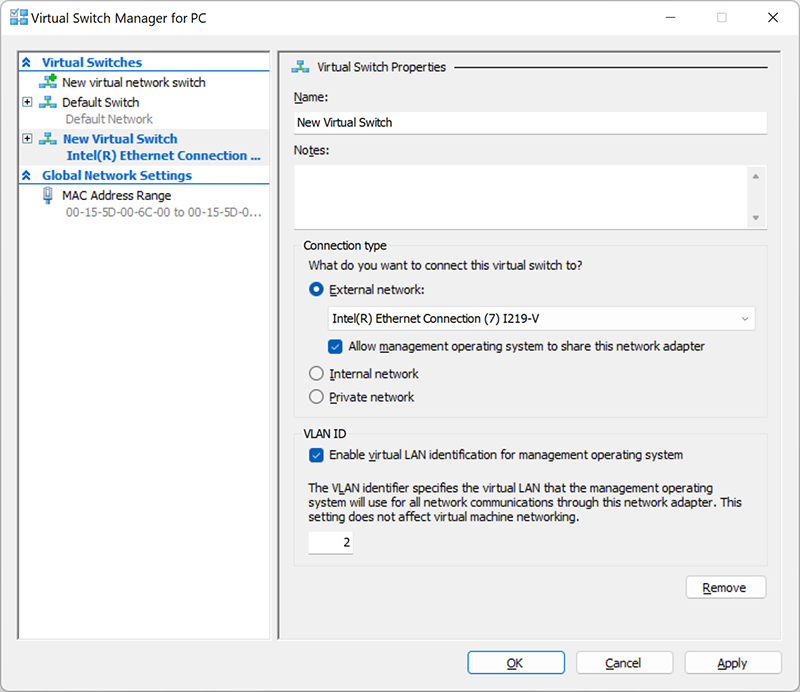
4. Далі дайте віртуальному комутатору ім’я та натисніть «ОК». Параметри за замовчуванням зазвичай підходять, але рекомендуємо переконатися, що підключення до зовнішньої мережі працює. Обов’язково оберіть мережевий адаптер, який фактично підключений до Інтернету, будь то Wi-Fi або дротове (провідне) з’єднання.
5. Налаштуйте тип підключення, вибравши «Тип мережі», до якої має бути підключений віртуальний комутатор (зовнішній, внутрішній, приватний). У випадку, якщо це буде «Зовнішня мережа», слід вибрати тип мережевого адаптера, який ви хочете використовувати, а потім поставити галочку на «Дозволити керуючій операційній системі надавати доступ до цього мережного адаптера».
Hyper-V підтримує роботу з VLAN (IEEE 802.1Q). Ви можете вручну налаштувати цей ідентифікатор, який потім використовуватиметься для мережних з’єднань. Для цього у властивостях віртуальних мережевих інтерфейсів поставте галочку навпроти «Дозволити ідентифікацію віртуальної локальної мережі для керуючої операційної системи» (або «Enable VLAN Identification»). Ця опція доступна для зовнішнього та внутрішнього типу мережі.
6. Після того, як ви натиснете «ОК», з’явиться наступне діалогове вікно:
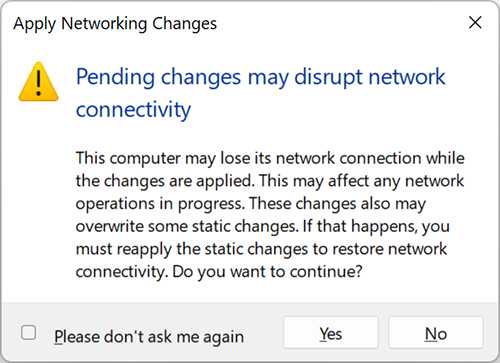
7. Після того, як ви натиснете «Так», буде створено віртуальний комутатор. Тепер ваше віртуальне середовище може використовувати власну віртуальну мережу для спрощення організації роботи кількох віртуальних машин.
Створення віртуальної машини Hyper-V
Давайте розглянемо три основні способи створення віртуальної машини Hyper-V, які здійснюються за допомогою:
- Диспетчера Hyper-V
- PowerShell
- Hyper-V Quick Create

Як створити віртуальну машину Hyper-V за допомогою диспетчера Hyper-V
Це досить простий та інтуїтивно зрозумілий метод створення віртуальної машини. Розглянемо його покроково:
1. У полі пошуку на панелі завдань введіть «Диспетчер Hyper-V» (або Hyper-V Manager). Відкрийте його, просто натиснувши «Enter».
2. Зверху в панелі швидкого доступу знайдіть меню «Дія» та у спливаючому вікні клацніть на «Створити». Потім виберіть «Віртуальна машина».
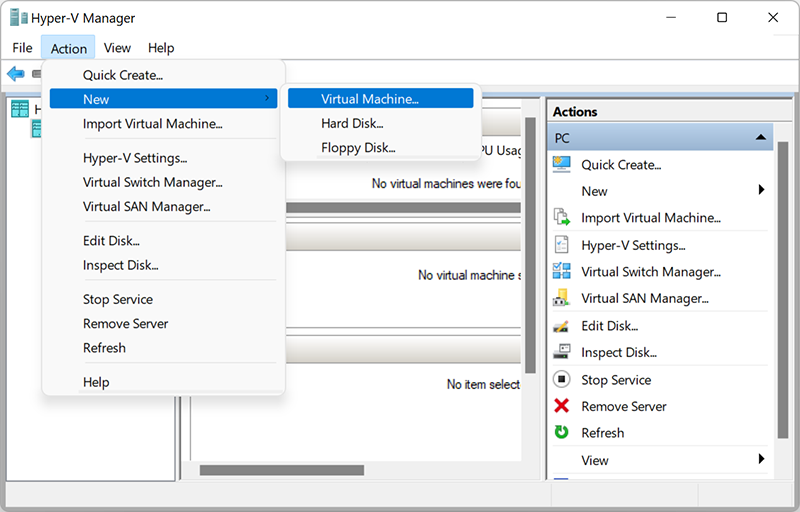
3. Далі відкриється майстер створення нової віртуальної машини з набором параметрів, кожний з яких необхідно налаштувати. Давайте докладно розглянемо кожен із них.
Налаштування параметрів при створенні віртуальної машини Hyper-V
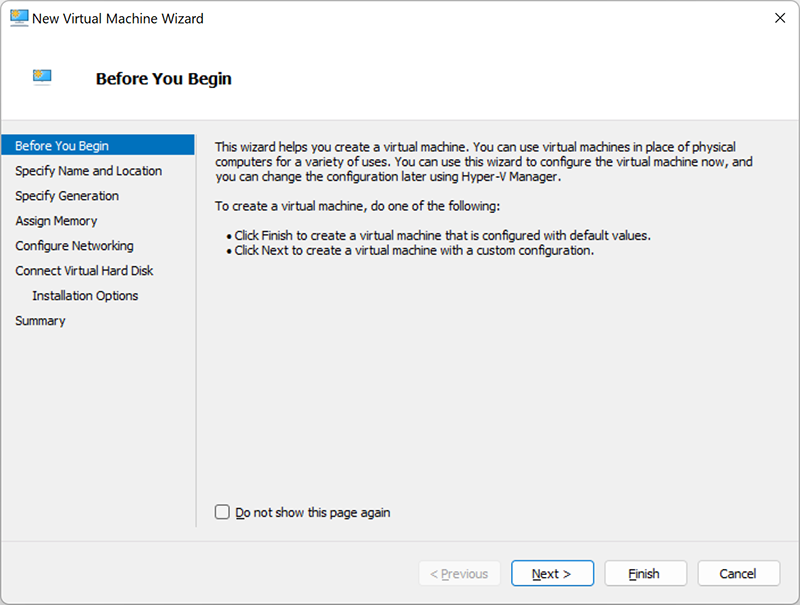
Приступаючи до роботи
У цьому розділі наведено короткий огляд можливостей майстра створення віртуальної машини та способів його використання. Рекомендуємо ознайомитись з ним. Також ви можете поставити галочку навпроти «Більше не показувати цю сторінку», якщо ця інформація вже засвоєна або не потрібна.
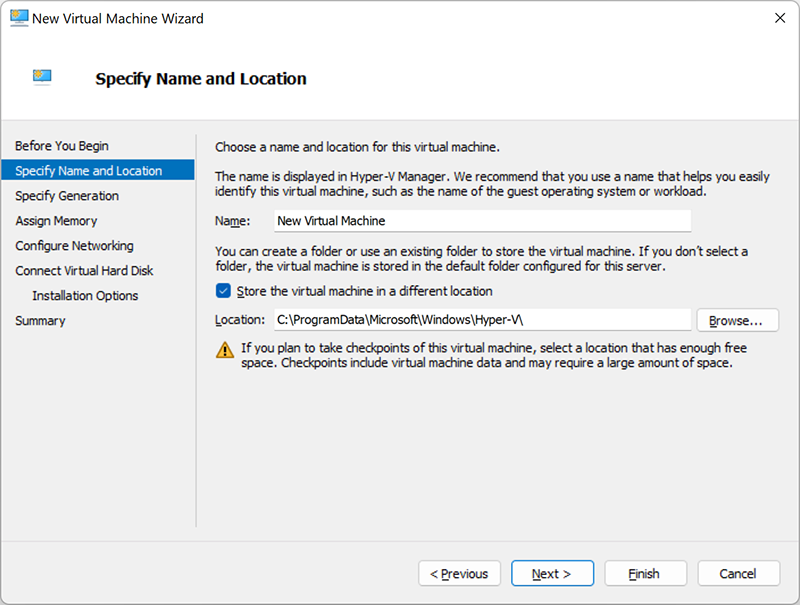
Вкажіть ім’я та розташування
Тут ви можете налаштувати ім’я та місце розташування віртуальної машини. Переконайтеся, що це ім’я є унікальним і дозволяє легко ідентифікувати віртуальну машину й надалі. Що стосується місця розташування, ви можете або залишити це значення за замовчуванням, або створити папку та вказати шлях до неї.
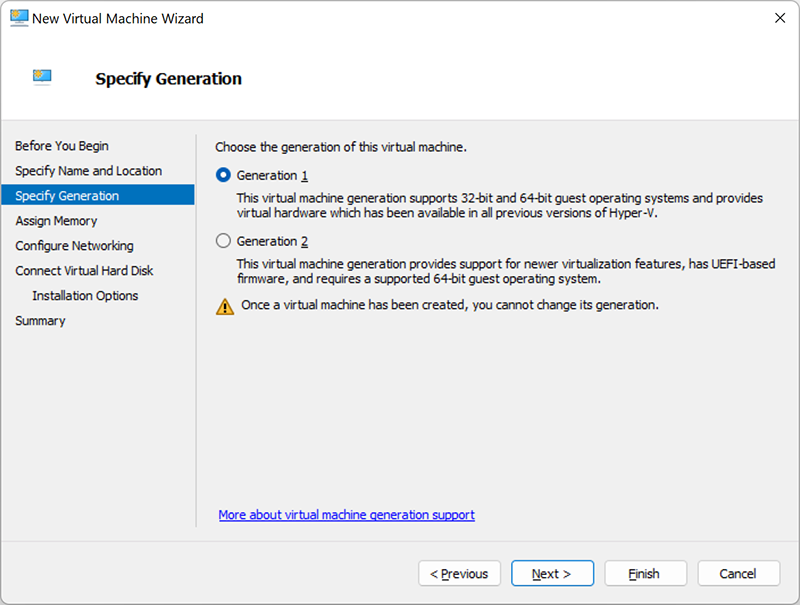
Вкажіть покоління
Вибір між поколінням 1 і поколінням 2 переважно залежить від гостьової операційної системи, яку ви хочете встановити. Віртуальні машини покоління 1 підтримують 32-розрядні та 64-розрядні гостьові ОС та архітектуру на основі BIOS. Крім того, вони гарантують функціональність ранніх версій Hyper-V. Віртуальні машини покоління 2 підтримують 64-розрядні ОС Windows та останні версії ОС Linux та FreeBSD. А також забезпечують розширені функції віртуалізації, такі як безпечне завантаження. При виборі важливо врахувати усі аспекти, оскільки ви не можете змінити покоління віртуальної машини після створення.
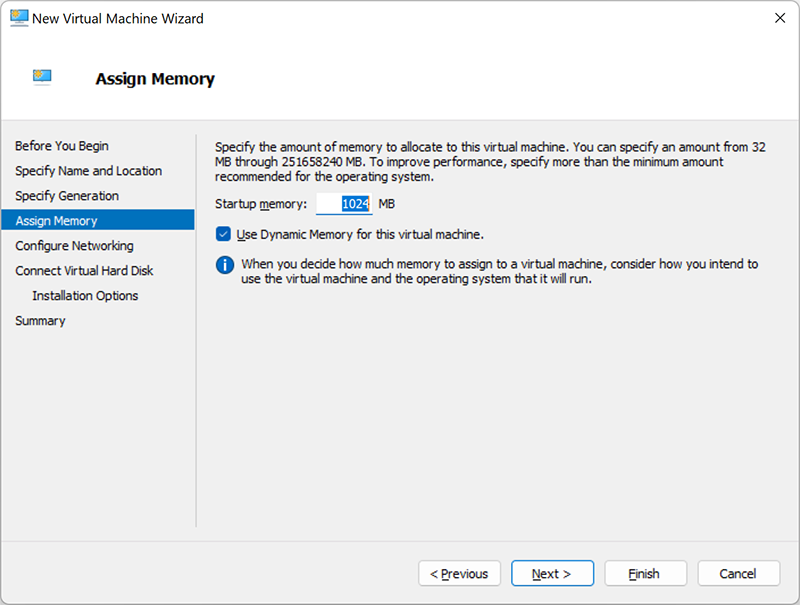
Виділіть пам’ять
Тут необхідно вказати обсяг пам’яті (від 32 МБ до 12582912 МБ), який буде виділено для роботи віртуальної машини. Оскільки від цього залежатиме її майбутня продуктивність. Крім того, ви можете вибрати використання динамічної пам’яті, поставивши галочку нижче. Ця функція дозволяє вам взяти частину пам’яті, яка доступна на фізичному хості, і виділити ресурси тій віртуальній машині, яка найбільше їх потребує.
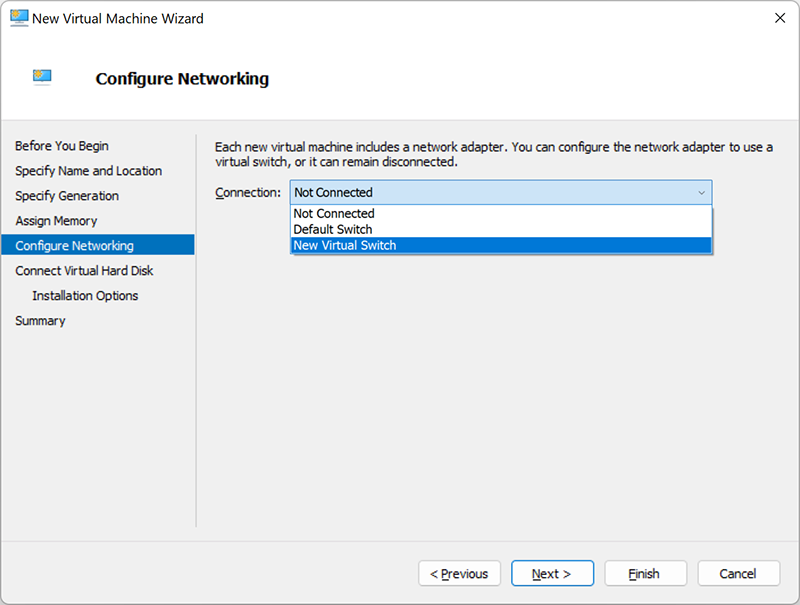
Налаштуйте мережу
У цьому розділі потрібно обрати віртуальну мережу, яка буде використовуватися для підключення віртуальної машини до мережі. Виберіть віртуальний комутатор, який ви створили раніше. Якщо у вас його немає, то залишається лише один варіант – «Не під’єднано». Це означає, що ваша віртуальна машина не має доступу до мережі.
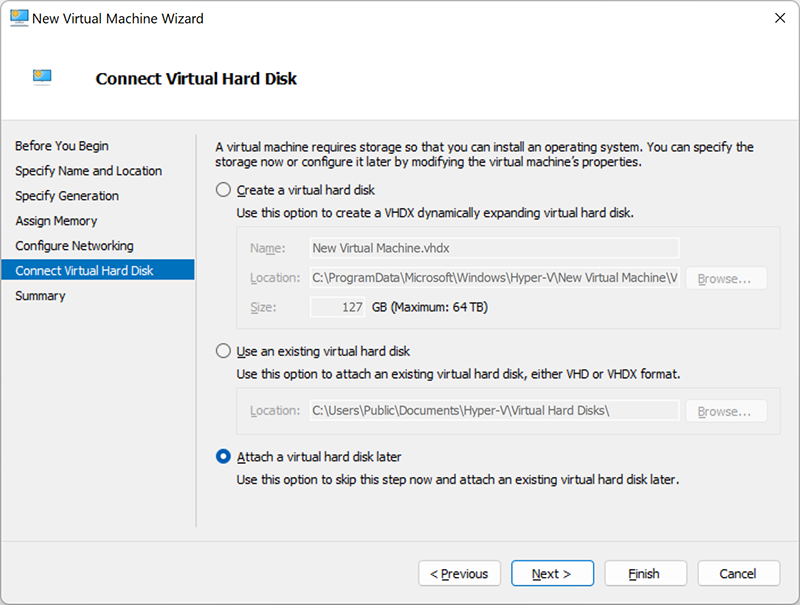
Підключіть віртуальний жорсткий диск
Тут ви можете створити новий віртуальний жорсткий диск, вказавши його ім’я, розташування та розмір. Також можна використовувати існуючий диск (формат VHD або VHDX). Або можете перенести цей крок на потім.
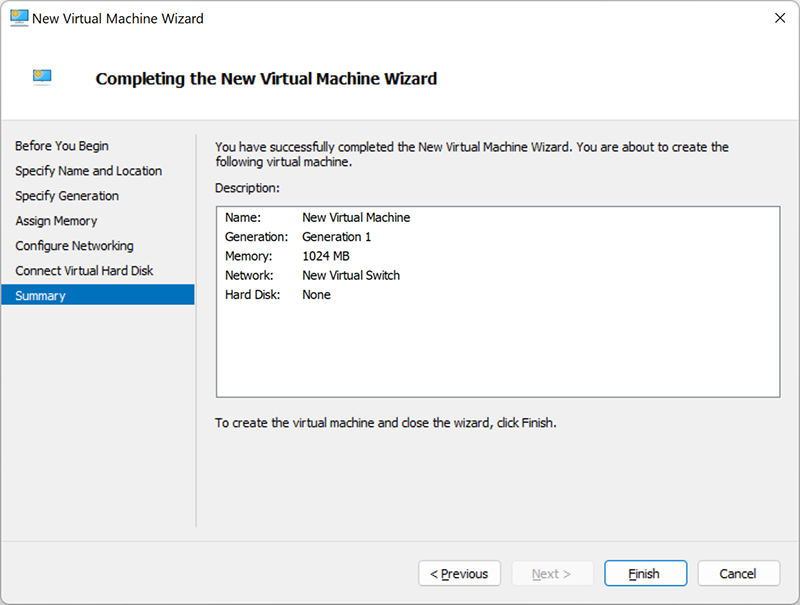
Зведення
Останній розділ параметрів налаштувань містить короткий опис створеної віртуальної машини. Перевірте і якщо все правильно, натисніть «Готово».
Як створити віртуальну машину Hyper-V за допомогою PowerShell
Якщо ви хочете створити повномасштабне віртуальне середовище з кількома віртуальними машинами, що одночасно працюють, вам підійде саме цей спосіб. PowerShell дозволяє створювати різні сценарії, які можна використовувати для автоматизації повсякденних робочих завдань.
Давайте покроково розглянемо, як створити нову віртуальну машину Hyper-V за допомогою PowerShell:
1. Введіть «Windows PowerShell» у рядку пошуку.
2. Клацніть на ній правою кнопкою миші та оберіть «Запуск від імені адміністратора».
3. 3. Пропишіть наступний скрипт (для наочного прикладу назвемо нашу нову віртуальну машину «DemoVM»): New-VM -Name DemoVM
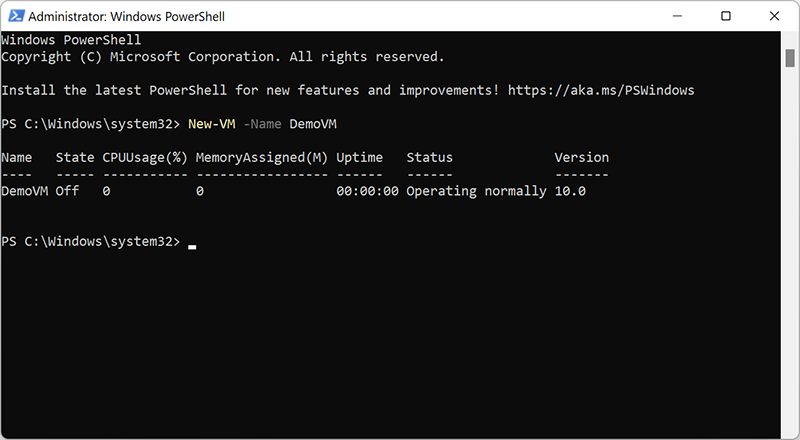
Перевірте у диспетчері Hyper-V, чи коректно було створено віртуальну машину. Вона повинна перебувати у вимкненому стані, оскільки це дозволить продовжити процес її налаштування.
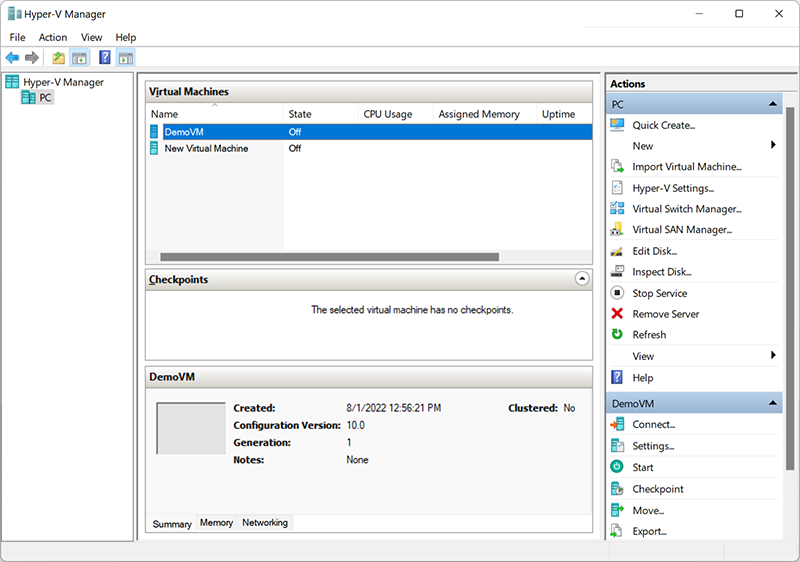
Створення віртуальних машин за допомогою PowerShell може бути складним, але насправді це досить простий процес. Перевагою цього способу є те, що сценарій PowerShell можна розширювати, включаючи додаткові параметри конфігурації.
Як створити віртуальну машину Hyper-V за допомогою Hyper-V Quick Create
Цей спосіб унікальний тим, що його можна виконати лише в кілька кліків. Спробуємо разом:
1. Відкрийте «Hyper-V Quick Create».
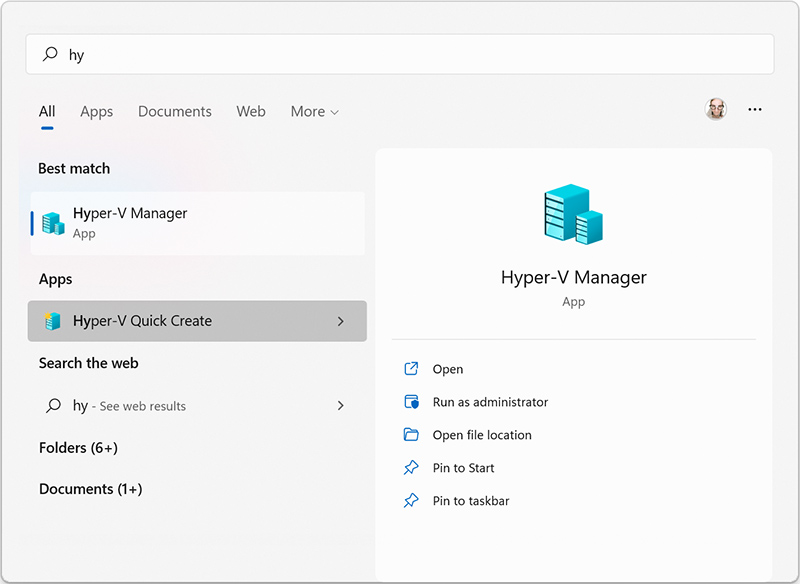
2. Виберіть операційну систему або встановіть гостьову ОС із файлу образу ISO (.iso) або VHD (.vhd або .vhdx) за допомогою локального джерела установки. Натисніть «Змінити джерело установки» та виберіть потрібний файл. Параметр «Безпечне завантаження» можна відзначити лише в тому випадку, якщо віртуальна машина працюватиме під керуванням ОС Windows.
3. Клацніть на «Додаткові параметри» у нижньому правому кутку. Далі введіть ім’я віртуальної машини та віртуальний комутатор.
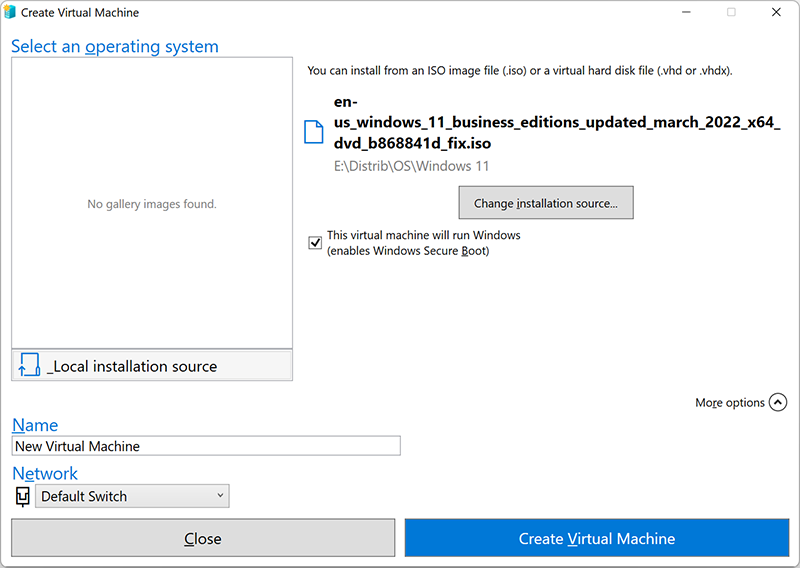
4. Натисніть кнопку «Створити віртуальну машину», щоб розпочати процес.
Запуск віртуальної машини Hyper-V
Після того, як ви створили віртуальну машину, можете сміливо починати працювати з нею.
Для цього відкрийте «Диспетчер Hyper-V», клацніть правою кнопкою миші на віртуальну машину, яку хочете запустити, та оберіть «Підключитися». Після цього буде запущено інструмент VMConnect.
Навіть якщо ваша віртуальна машина знаходиться у вимкненому стані, вона буде автоматично завантажена при натисканні кнопки «Пуск».
Рекомендації щодо безпеки та захисту даних Hyper-V
Hyper-V надає платформу віртуалізації, на якій можна створювати віртуальні середовища різного масштабу та складності. Це значно розширює можливості користувача. Але після створення віртуальної машини Hyper-V в першу чергу потрібно подумати про її безпеку та збереження всіх файлів. Існують різні користувацькі та програмні рішення щодо захисту даних для середовищ Hyper-V. Рекомендуємо вивчити питання резервного копіювання, реплікації на основі образів тощо.
Як відновити втрачені дані на віртуальній машині Hyper-V
Одним із головних недоліків віртуалізації є те, що жодна система не передбачає вбудованих функцій відновлення. У процесі роботи користувач може зіткнутися зі збоєм роботи операційної системи, вірусними атаками, непрацездатністю віртуальної машини або пошкодженням файлової системи. Причин втрати або видалення даних може бути безліч.
У таких ситуаціях найкраще скористатись спеціалізованим програмним забезпеченням для відновлення даних. І чим скоріше ви почнете, тим вище ймовірність успішно витягти всі загублені файли.
Як відновити віртуальну машину в Hyper-V за допомогою Magic Partition Recovery
Щоб відновити видалену віртуальну машину, перш за все потрібно відновити файли конфігурації та диска цієї віртуальної машини. Далі за допомогою функції «Імпорту віртуальних машин» імпортувати відновлені файли до Hyper-V.
Давайте розглянемо, як це зробити поетапно на прикладі інструмента Magic Partition Recovery:
1. Завантажте та встановіть Magic Partition Recovery на свій комп’ютер.
2. Запустіть програму та проскануйте диск, на якому зберігалися файли віртуальної машини.
3. У вікні програми перейдіть до папок зберігання файлів дисків, параметрів та конфігурації віртуальної машини та відновіть їх. Важливо пам’ятати, що:
- *.vhdx – файл диска віртуальної машини. Місце розташування за замовчуванням: C:\Users\Public\Documents\Hyper-V\Virtual hard disks
- *.vmcx – файл конфігурації параметрів віртуальної машини. Місце розташування за замовчуванням: C:\ProgramData\Microsoft\Windows\Hyper-V\Virtual Machines
Успішне відновлення цих файлів дасть можливість повернути повністю працездатну віртуальну машину з усіма даними на диску.

Як відновити файли на диску віртуальної машини Hyper-V за допомогою Magic Partition Recovery
У разі втрати даних на диску віртуальної машини ви також можете скористатися програмою Magic Partition Recovery. Інструмент включає функцію монтування віртуальних дисків, завдяки чому ви легко зможете відновити всі видалені файли.
Ключовим аспектом для успішної роботи Magic Partition Recovery є те, що програма має бути встановлена на основній операційній системі Windows, а не на гостьовій ОС.
Давайте розглянемо основні кроки відновлення файлів з диска Hyper-V:
1. Запустіть програму Magic Partition Recovery та натисніть кнопку «Монтувати диск».
2. У вікні, що з’явилося, виберіть «Hyper-V» та натисніть «Далі».
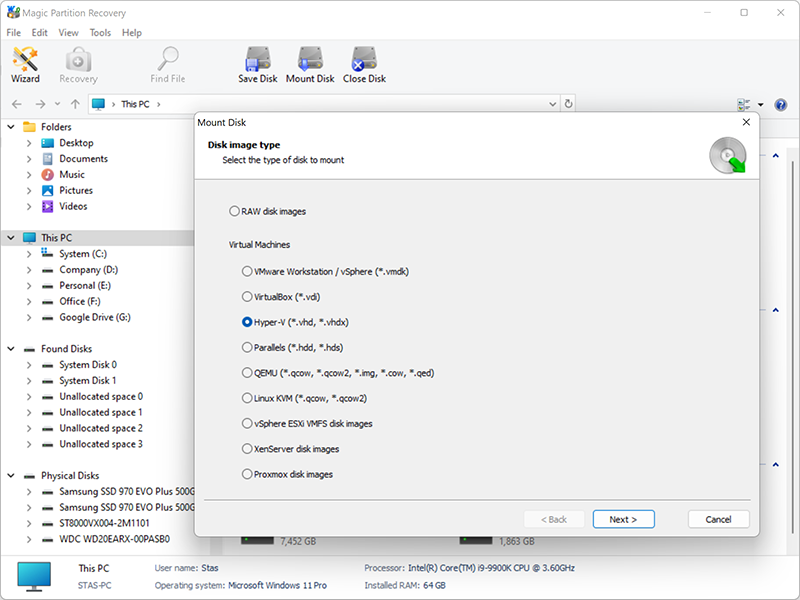
3. Далі перейдіть до папки з віртуальною машиною та натисніть «ОК».
4. Після всіх дій у вікні програми з’явиться Монтований диск. Якщо у вас є кілька дисків віртуальної машини, ви також можете їх змонтувати. Після цього у вікні програми з’явиться повний перелік всіх змонтованих дисків.
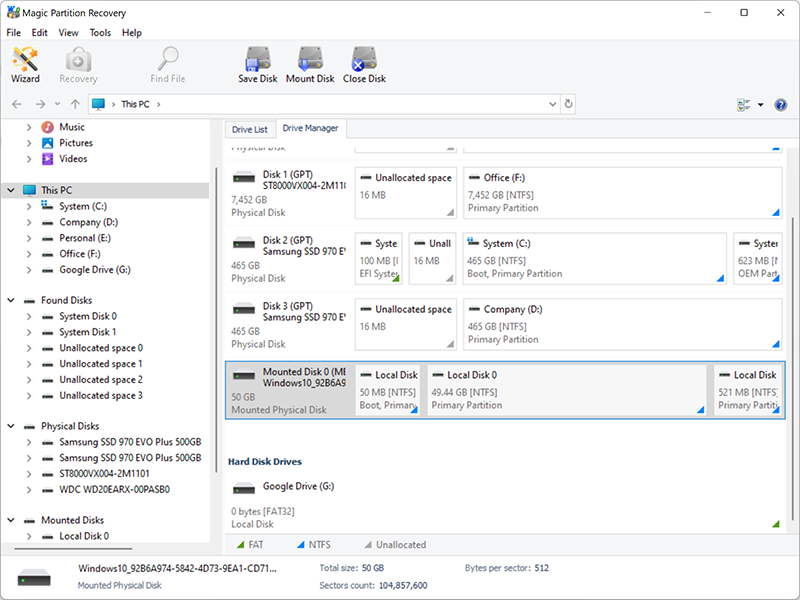
5. Натисніть на монтованому диску і виконайте сканування.
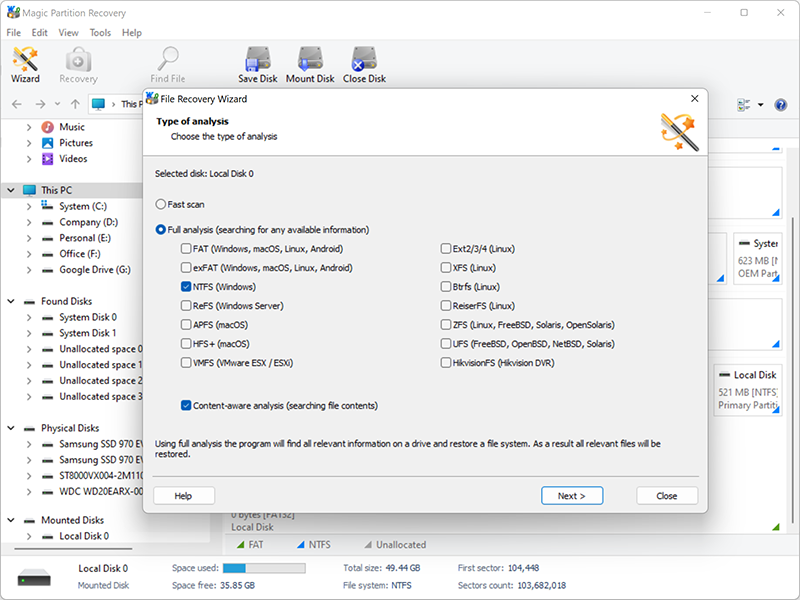
6. Після закінчення аналізу програма відобразить усі відновлені файли. Знайдіть у списку необхідні та відновіть їх.
Сподобалася стаття?
Часті питання
-
Hyper-V надає можливість користувачу запускати декілька операційних систем у вигляді віртуальних машин в ОС Windows. Кожна віртуальна машина діє як повноцінний комп'ютер, що запускає операційну систему та програми.
-
*.vhdx – файл диска віртуальної машини. Місце розташування за замовчуванням: C:\Users\Public\Documents\Hyper-V\Virtual hard disks
*.vmcx – файл конфігурації параметрів віртуальної машини. Місце розташування за замовчуванням: C:\ProgramData\Microsoft\Windows\Hyper-V\Virtual Machines
-
Ви можете скористатися спеціалізованим програмним забезпеченням, щоб отримати всі втрачені дані з Hyper-V. Наприклад, інструмент Magic Partition Recovery має вбудовану функцію відновлення даних з дисків віртуальних машин. До речі, утиліта надає можливість відновлення не тільки з дисків Hyper-V, але й практично всіх віртуальних машин, що існують на сьогоднішній день, включаючи найпопулярніші, таких як VMWare, Oracle VirtualBox, Linux-KVM і т.д.
Будьте на зв'язку





Коментарі