Restauración “paso a paso” utilizando Magic Photo Recovery
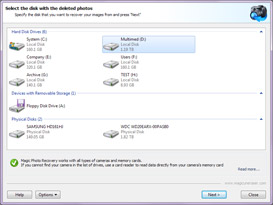
Selección de Disco
Primero que nada, usted necesita seleccionar un disco que contenga las imágenes eliminadas. El programa mostrará la lista de discos encontrados en su computadora. Además de sus volúmenes de discos duros, esta lista contiene todos los dispositivos conectados (Dispositivos USB, tarjetas de memoria, etc.). Magic Photo Recovery trabaja con toda clase de cámaras y tarjetas de memoria.
Si no puede conseguir su cámara en la lista de dispositivos, utilice un lector de tarjetas para leer los datos directamente desde la memoria de su cámara.
Seleccione el dispositivo que contiene los archivos eliminados y haga click en “Continuar”. Magic Photo Recovery comenzará a analizar el disco seleccionado. Este proceso puede tomar algo de tiempo. Todas las imágenes detectadas por el programa durante el análisis serán añadidas a la lista de pre-visualización. Usted puede detener el proceso de análisis en cualquier momento (Por ejemplo, si el programa ya consiguió la imagen que usted buscaba), pero, recomendamos esperar a que el proceso haya finalizado. También puede regresar y seleccionar otro disco para analizar.
Selección de Imágenes
Magic Photo Recovery añade todas las imágenes recuperables a una lista de pre-visualización, donde usted tendrá una vista previa de las mismas, puede filtrar las imágenes y seleccionar los archivos que desea recuperar.
La ventana de selección de imágenes se muestra inmediatamente después de que se haya finalizado el proceso de análisis de disco. Aquí, usted puede seleccionar las fotos que desea recuperar.
La lista de imágenes ocupa casi toda la ventana del programa. La parte inferior contiene las siguientes opciones para sus imágenes:
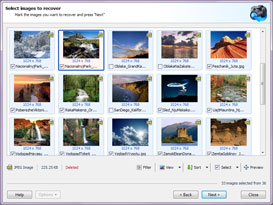
“Filtrar” – habilita/deshabilita el filtrado. Usted puede filtrar las imágenes por tipo, máscara, tamaño y resolución. Una vez haya aplicado el filtro, la lista de imágenes solo mostrará las fotos que cumplan el criterio de búsqueda. Para mostrar todas las imágenes, solo debe deshabilitar el filtro.
“Ordenar” – usted puede ordenar la lista de imágenes por nombre, estado, tamaño y resolución. Si escoge la opción de “No ordenar”, las imágenes serán mostradas en el orden que sean detectadas.
“Ver” – cambia la forma en que se visualizan las imágenes (“Miniaturas”, “Íconos”, “Lista”, “Detalles”).
Las opciones de “Seleccionar Todo”, “Limpiar Selección” e “Invertir Selección” son utilizadas para seleccionar imágenes de la lista.
“Vista previa” – le muestra una vista previa de la imagen.
Presione “Siguiente” para proceder al siguiente paso.
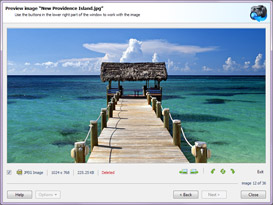
Realizando una Vista Previa
Usted puede realizar una vista preliminar de cualquier imagen antes de recuperarla. La parte inferior izquierda de la ventana contiene la información del archivo: estado de recuperación, estado actual (existente o eliminada), tipo de imagen, resolución y tamaño.
La parte inferior derecha de la ventana contiene los siguientes botones:
“Imagen anterior”, “Siguiente Imagen” – Le permiten realizar una vista previa de la imagen anterior/siguiente de la lista.
“Rotar 90° de forma anti horaria”, “Dar la vuelta”, “Rotar 09° de forma Horaria” – Le permiten rotar la imagen en el modo de vista preliminar para una mejor conveniencia.
El botón “Salida” se utiliza para cerrar la ventana de vista preliminar y volver a la lista de imágenes.
Guardar los Archivos Recuperados
Aquí usted puede seleccionar la carpeta donde desea guardar los archivos recuperados. Se recomienda seleccionar un disco diferente al disco de recuperación: Por ejemplo, si está recuperando imágenes del disco “C”, seleccione el disco “D” como disco de salida.
Si desea restaurar la estructura de las carpetas que contienen los archivos recuperados, escoja la opción “Restaurar la estructura de la carpeta”. Si esta opción se selecciona, todas las subcarpetas serán restauradas y los archivos aparecerán en las mismas locaciones que tenían antes de ser eliminados. De lo contrario, todas las imágenes serán guardadas en una sola carpeta.
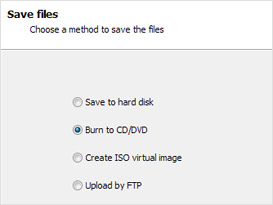
Cuando se hayan recuperado algunos archivos, la letra inicial de su nombre se habrá perdido y será remplazada por el carácter “?”. Puede haber otros archivos que no tengan partes de sus nombres. Por esta razón, la aplicación tiene la opción “Reemplazar todos los caracteres desconocidos por”, la que permite remplazar el símbolo “?” por cualquier carácter que usted desee.
Presione “Siguiente” para recuperar las imágenes seleccionadas o “Atrás” para cambiar su selección. La versión no registrada no permite recuperar las imágenes, por lo que se le pedirá registrarse al hacer click en el botón “Next”.
(English) Help
(English) Useful Articles
¿Por qué nuestros productos?
Recupera de
cualquier cámara
Trabaja con todo tipo de fotos y restaura imágenes de cualquier cámara, tanto corrientes como profesionales.
Lee mas